Gel UV for Nails
- Guaranteed German quality
- Safe for nail health
- Professional-level UV gels
- No harmful chemicals
- Recommended for salons & technicians
- Long-lasting


Quality UV gels by Cupio
Cupio's UV gels stand out in the market due to their exceptional quality and commitment to safety. Crafted with precision, these gels undergo rigorous testing to ensure they meet the highest standards, providing both professionals and enthusiasts with reliable and durable products. Their formulations are designed to be user-friendly, ensuring a smooth application process and a long-lasting finish.
What UV Gels are
UV gels are specialized nail products that harden upon exposure to ultraviolet light. Comprising oligomers and monomers, these gels undergo a polymerization process when cured under a UV lamp, resulting in a durable and glossy finish. This technology offers a longer-lasting alternative to traditional nail polishes, making it a popular choice in modern nail artistry.
The different types of UV gels
UV gels vary in opacity and viscosity, each serving distinct purposes:
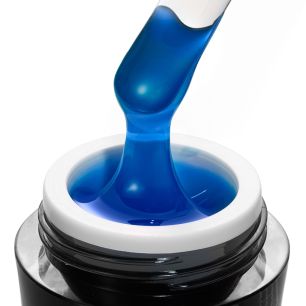
- Clear Gels: Ideal for natural nail overlays or as a base for color application, offering a transparent finish.
- Builder Gels: Thicker in viscosity, these gels are perfect for nail extensions and sculpting, providing strength and structure.
- Camouflage or Cover Gels: With a natural nail hue, they conceal imperfections and are excellent for creating a flawless nail bed appearance.
The viscosity of a gel influences its application; thicker gels are less likely to self-level, offering more control during sculpting, while thinner gels spread more easily, suitable for overlays.
What is UV nail gel used for?
UV nail gels serve multiple functions:
- Nail Enhancements: Providing added strength to natural nails, reducing breakage.
- Extensions: Allowing the creation of longer nails through sculpting or tips.
- Artistic Designs: Offering a versatile medium for intricate nail art due to their workable consistency.
Who can use UV Gels
Both professional nail technicians and individuals at home can use UV gels. However, proper training is recommended to ensure correct application and to maintain nail health. Beginners should start with simpler applications before progressing to more advanced techniques.
How to apply UV gel polish
Applying UV gel polish involves several steps:
- Preparation:
- Cleanse: Remove any existing polish and sanitize hands.
- Shape: File nails to the desired shape and gently push back cuticles.
- Buff: Lightly buff the nail surface to remove shine, promoting better adhesion.
- Application:
- Base Coat: Apply a thin layer of base gel to protect the natural nail.
- Cure: Place nails under a UV lamp for the recommended time to harden the base coat.
- Color Coat: Apply the chosen UV gel polish color in thin, even layers, curing each layer under the UV lamp.
- Top Coat: Seal the color with a top coat to add shine and protection, then cure.
- Finishing:
- Cleanse: Wipe nails with a lint-free pad soaked in cleanser to remove any tacky residue.
- Hydrate: Apply cuticle oil to nourish the surrounding skin.
For optimal results, using quality brushes and tools is essential. Cupio offers a range of application brushes and electric drills to assist in achieving a professional finish.
How to use UV gels for nail extensions
Creating nail extensions with UV gels involves:
- Preparation: Follow the same initial steps as gel polish application.
- Form Application: Place a nail form securely under the natural nail's free edge to support the extension.
- Building the Extension:
- Apply Builder Gel: Using a suitable builder gel, apply it over the natural nail and onto the form, extending to the desired length.
- Cure: Harden the gel under a UV lamp.
- Repeat: Apply additional layers if necessary, curing each layer.
- Shaping: Once the gel is fully cured, remove the form and file the nail to the desired shape and smoothness.
- Finishing: Apply color or top coat as desired, following standard gel polish application steps.
When should you use UV gels?
UV gels are ideal when seeking a long-lasting, durable manicure, especially for those with weak or brittle nails. They are also suitable for creating nail extensions or when desiring intricate nail art that requires a sturdy foundation.
How long should you cure UV gel?
Curing times for UV gels vary depending on the product and the lamp's power. Typically, each layer should be cured for 30 seconds to 2 minutes under a UV lamp. It's crucial to follow the manufacturer's instructions to ensure proper curing and to prevent issues like peeling or lifting.
What type of brush is recommended for UV and LED gel applications?
Using the correct brush is vital for precise application:
- Flat or Oval Brushes: Ideal for applying base and color gels due to their ability to create smooth, even layers.
- Pointed Brushes: Suitable for detailed nail art and reaching tight areas near the cuticles.
Cupio offers a variety of brushes designed specifically for gel applications, ensuring that users can achieve professional results.
Types of buffers to use for finishing UV gel manicures
Buffers are essential for achieving a flawless finish:
- Coarse Grit Buffers (100/180 grit): Used to shape and smooth the surface of the gel.
- Medium Grit Buffers (240 grit): Ideal for refining the nail surface and preparing it for polish application.
- Fine Grit Buffers (400-600 grit): Used for final smoothing and removing any imperfections.
- Shine Buffers (1000+ grit): For achieving a high-gloss finish on natural or gel nails without the need for a top coat.
Using the right buffer ensures a smooth and polished look, preventing rough edges and uneven surfaces.
How can UV gel polish be removed from the nail?
Proper removal of UV gel polish is essential to maintain nail health. Follow these steps:
1. Buff the Top Layer
Use a 100/180 grit buffer to break the seal of the top coat.
2. Soak in Acetone
Soak a cotton pad in pure acetone, place it on the nail, and wrap each fingertip with foil.
Leave for 10-15 minutes, allowing the gel to dissolve.
3. Gently Remove the Gel
Use a cuticle pusher or an orange stick to gently scrape off the softened gel.
Avoid excessive force to prevent nail damage.
4. Hydrate and Nourish
Apply cuticle oil and a nail strengthener to restore moisture and protect the nails.
Using electric nail drills can speed up the removal process, but proper technique is crucial to prevent damage.
What is the difference between builder gel and UV gel?
While both builder gel and UV gel are used for nail enhancements, there are key differences:
- A thicker, self-leveling gel used for nail extensions and strengthening natural nails.
- Provides additional durability and flexibility, ideal for creating long-lasting enhancements.
UV Gel
- Typically refers to gel polishes that require UV light for curing.
- Used for color application, overlays, and glossy finishes.
Choosing the right product depends on the desired result—builder gels for structure and strength, and UV gels for color and shine.
How to use UV gels for nail extensions
Creating nail extensions with UV gels is a professional technique that results in long, durable, and natural-looking nails. Follow this step-by-step guide to achieve flawless extensions using Cupio UV gels.
Step 1: Preparation
- Sanitize hands and nails to ensure a clean application.
- Remove any existing polish with acetone.
- Shape the natural nails using a nail file (180/240 grit).
- Push back and trim the cuticles using a cuticle pusher.
- Buff the nail surface lightly with a buffer to remove shine and improve adhesion.
- Remove dust and wipe nails with a lint-free pad soaked in a nail cleanser.
Step 2: Applying the Nail Forms or Tips
- Using Nail Forms:
- Position a nail form under the natural nail’s free edge, ensuring a snug fit.
- Pinch the form slightly to create the desired nail curve.
- Using Nail Tips:
- Choose a nail tip that matches the width of the natural nail.
- Apply nail glue to the underside of the tip and attach it to the nail.
- Trim and shape the tip as needed.
Step 3: Applying the UV Gel for Extensions
- Apply a thin layer of base gel to the natural nail and tip/form.
- Cure under a UV lamp for 30-60 seconds.
- Apply the Builder UV Gel in thin layers:
- Start by applying a small amount to the center of the nail.
- Use a gel brush to guide the gel toward the edges, ensuring an even application.
- Extend the gel onto the nail form or tip to create the desired length.
- Cure each layer under a UV lamp for 60-120 seconds.
- Repeat the process if additional thickness or strength is needed.
Step 4: Shaping and Finishing
- Remove the nail form (if used).
- Use a nail file (100/180 grit) to refine the shape and smooth out any uneven areas.
- Buff the surface with a 240 grit buffer for a polished finish.
- Apply a top coat to seal the gel and add shine.
- Cure under a UV lamp for 60 seconds.
- Wipe away the sticky residue with a nail cleanser.
Step 5: Hydration and Care
- Apply cuticle oil to nourish the nails and surrounding skin.
- Avoid excessive exposure to water for the first few hours to ensure proper adhesion.
How to prevent UV gel from lifting
Lifting occurs when the gel separates from the natural nail, leading to chipping or peeling. To prevent this:
- Proper Nail Prep:
- Ensure the nail surface is clean, dry, and free of oils before application.
- Buff the nail lightly to create a better adhesion surface.
- Use a High-Quality Primer & Base Coat:
- A bonding primer enhances adhesion, reducing the risk of lifting.
- Thin, Even Layers:
- Avoid applying thick layers, as they may not cure properly, leading to separation.
- Seal the Edges:
- Cap the free edge with each coat to lock in the gel and prevent premature wear.
- Avoid Excessive Moisture:
- Do not expose nails to water or oils for a few hours after application.
By following these steps, UV gel nails will last longer without peeling or lifting.
